
The Windows Subsystem for Linux provides developers a platform to run a GNU/Linux environment directly on Windows, including most command-line tools, utilities, and applications, without the overhead of a traditional virtual machine or dualboot setup.
Windows Subsystem for Linux (WSL)
Overview
What is WSL?
The Windows Subsystem for Linux provides developers a platform to run a GNU/Linux environment directly on Windows, including most command-line tools, utilities, and applications, without the overhead of a traditional virtual machine or dualboot setup.
Invoke Windows application using a Unix-like command-line shell.
Invoke GNU/Linux application on Windows.
Run GNU/Linux graphical application integrated directly to your Windows desktop.
Use GPU acceleration for machine learning, data science scenarios and more.
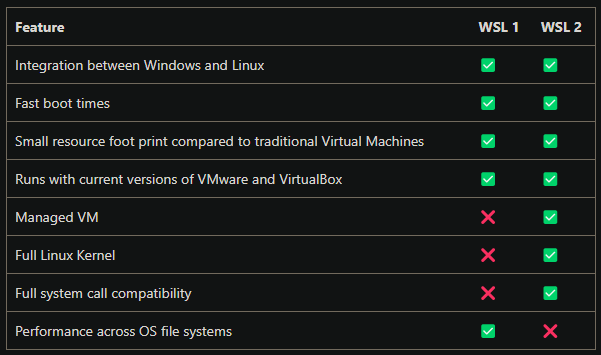
Comparing WSL versions
WSL 2 is a new version of the WSL architecture that powers the WSL to run ELF64 Linux binaries on Windows. Its primary goals are to increase file system performance, as well as adding full system call compatibility. This new architecture changes how these Linux binaries interact with Windows and computer’s hardware, benefiting from running a real Linux kernel.
The primary differences between WSL 1 and WSL 2 are the use of an actual Linux kernel inside a managed VM, support for full system call compatibility, and performance across the Linux and Windows operating system.
WSL 2 Architecture
A traditional VM experience can be slow to boot up, is isolated, consumes a lot of resources, and requires your time to manage it. However, WSL 2 provides the benefits of WSL 1, including seamless integration between Windows and Linux, fast boot time, small resource consumption, and requires no VM configuration or management. While WSL 2 does use a VM, it is managed and run behind the scenes, leaving you with the same user experiences WSL 1.
Full Linux Kernel
The Linux kernel in WSL 2 is built by Microsoft from the latest stable branch, based on the source available at kernel.org. This kernel has been specially tuned for WSL 2, optimizing for size and performance to provide an amazing Linux experience on Windows.
Increased file IO performance
File intensive operations like git clone, npm install, apt update, and more are all noticeably faster with WSL 2. The actual speed increase will depend on which ap you’re running and how it is interacting with the file system.
Full system call compatibility
Linux binaries use system calls to perform functions such as accessing file, requesting memory, creating processes, and more. Whereas WSL 1 used a translation layer that was built by the WSL team, WSL 2 includes its own Linux kernel with full system call compatibility.
Basic wsl commands
wsl --help
Get started with Git
Git Credential Manager setup
GCM is a secure GIt credential helper built on .NET that can be used with both WSL 1 and WSL 2. It enables multi-factor authentication support for GitHub repos, Azure DevOps, Azure DevOps Server, and Bitbucket. Once you’re authenticated to your hosting provider, requests a new authentication token, It then stores the token in the GCM. After the first time, you can use GIt to talk to your hosting provider without needing to re-authenticate.
# if GIt installed is >= v2.36.1
git config --global credential.helper "/mnt/c/Program\ Files/Git/mingw64/bin/git-credential-manager-core.exe"
# else if version is < v2.36.1 enter this command:
git config --global credential.helper "/mnt/c/Program\ Files/Git/mingw64/libexec/git-core/git-credential-manager.exe"
Proxy settings are unique to the specific WSL installation and not shared with others or the Windows host.
Connect to GitHub with Secure Shell Protocol (SSH)
About SSH. With SSH protocol, you can connect and authenticate to remote servers and services. With SSH keys, you do not need to provide your username and personal access token at each visit. You can also use an SSH key to sign commits. When you set up SSH, you will need to generate a new private SSH key and add it to the SSH agent. You must also add the public SSH key to your account on GitHub before you use the key to authenticate or sign commits.
Checking for existing SSH keys. Before you generate a new SSH key, you should check your local machine for existing keys. Just Enter
ls -al ~/.sshto see if existing any SSH key at present. If you see an existing public and private key pair listed, you would like to use to connect to GitHub, and add the key to the ssh-agent.Generating a new SSH key and adding it to the ssh-agent. You can generate a new SSH key on your local machine. After you generate the key, you can add the key to your account on GitHub.com to enable authentication for GIt operations over SSH. Paste
ssh-keygen -t ed25519 -C "your_email@example.com"then create a new SSH key. If you don’t have extra requirements (specific file location or passphrase, etc.), press Enter to the end.Before adding a new SSH key to the ssh-agent to manage your keys, you should have checked for existing SSH keys and generated a new SSH key. First, ensure the ssh-agent is running.
eval "$(ssh-agent -s)"Second, add your SSH private key to the ssh-agent. If you created your key with a different name, or if you are adding an existing key that has a different name, replace id_ed25519 in the command with the name of your private key file. Finally, add the SSH key to your account on GitHub.If you are using macOS or Linux, you may need to update your SSH client or install a new SSH client prior to generating a new SSH key.
Adding a new SSH key to your GitHub account. After you generate an SSH key pair, you must add the public key to GitHUb.com to enable SSH access for your account.
Testing your SSH connection.
Working with SSH key passphrases. You can secure your SSH keys configure an authentication agent so that you won’t have to reenter your passphrases every time your use your SSH keys.